Knee injuries account for nearly one-third of all skiing injuries in the United States each year — and in a significant portion of those cases, a binding that failed to release at the right moment is the direct cause. Learning how to choose ski bindings isn't just a gear decision. It's a safety decision. The right binding locks your boot in place when you're charging hard, and releases cleanly when a fall puts dangerous torque on your knee or tibia.
Most skiers spend hours obsessing over which skis to buy and barely ten minutes on bindings. That's backwards. Your bindings do two jobs at once: transfer power from your legs to the ski and protect your joints when something goes wrong. Nail both, and everything about your skiing gets better — performance and safety included.
Whether you're setting up your first pair or replacing worn-out gear, this guide walks you through every factor that matters. For broader gear and technique advice, start at our skiing resource hub.
Contents
What Ski Bindings Are Actually Doing Beneath Your Boots
Before you can choose the right binding, you need to understand what it's actually doing — because the mechanics directly inform every spec you'll compare when shopping.
The Release Mechanism Explained
A ski binding uses a spring-loaded toe piece and heel piece to grip your boot. In a fall, those springs compress and release based on how much force is applied and in which direction. The system works like this:
- Toe piece rotates horizontally — releases in twisting or lateral falls, protecting the knee
- Heel piece releases vertically — triggers in forward falls, protecting the tibia and ankle
- Both pieces can release simultaneously in complex multi-directional falls
- Release happens in a fraction of a second — faster than any conscious reaction
The quality of that release — not too easy, not too stiff — is what separates a well-chosen binding from a dangerous one. That quality is measured by a single number: your DIN value.
DIN — The Universal Release Standard
DIN stands for Deutsches Institut für Normung — the German standards body that established the global system for ski binding release calibration. Every alpine binding sold worldwide uses this scale. For more historical context, the Wikipedia article on ski bindings covers how the standard evolved over decades.
Your DIN setting is a number — typically between 0.75 and 18 — that tells the binding how much force is needed before it releases:
- Low DIN (1–4): Releases easily — correct for beginners, children, and lighter skiers
- Mid DIN (5–9): Balanced retention — most recreational adult skiers fall here
- High DIN (10–18): Requires significant force — for aggressive, heavy, or expert skiers
Setting your DIN even one unit too high significantly increases your risk of a knee injury. When in doubt, always err lower — you can adjust upward later if you're pre-releasing on normal terrain.

The Profile Factors That Determine Your Binding Choice
Knowing how to choose ski bindings means knowing yourself as a skier first. Bindings are not one-size-fits-all, and the right DIN range for your setup is calculated from your individual profile.

Your Physical Stats Matter More Than You Think
Four inputs feed directly into your recommended DIN range. All four matter — skip one and the calculation is wrong:
- Body weight: Heavier skiers generate more force in a fall, so they need higher release thresholds
- Boot sole length (BSL): Longer boots create more leverage — BSL is printed inside your boot cuff
- Height: Taller skiers generate greater rotational force during a fall
- Age: Skiers over 50 receive a slightly reduced DIN due to bone density considerations in most manufacturer charts
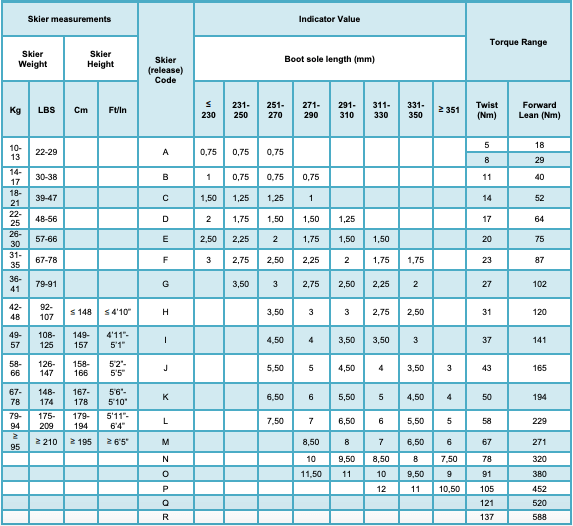
These four numbers map onto a standardized DIN table to produce your recommended setting range. Use a resource like the DIN calculator guide to walk through exactly how that number is calculated for your specific stats.
Skill Level and Skiing Style
Beyond physical inputs, your skill classification shifts your DIN range up or down by a full tier. Binding manufacturers use three standard categories:
- Type I (Beginner/Cautious): Lower release force — prioritizes releasing in a fall over retention during skiing. Best for new skiers or those with a history of lower-leg injuries.
- Type II (Intermediate/All-Mountain): Balanced — the most common classification for recreational adult skiers. Good retention without being dangerously stiff.
- Type III (Expert/Aggressive): High retention — designed for hard-charging skiers who need their boot to stay locked in on demanding terrain.
Your style matters too. Freestyle and park skiers often ski at Type II even if they're technically advanced, because trick landings create unusual multi-directional forces. Selecting the wrong type is one of the most common errors beginners make — and it contributes directly to the skiing accidents that land people in urgent care.
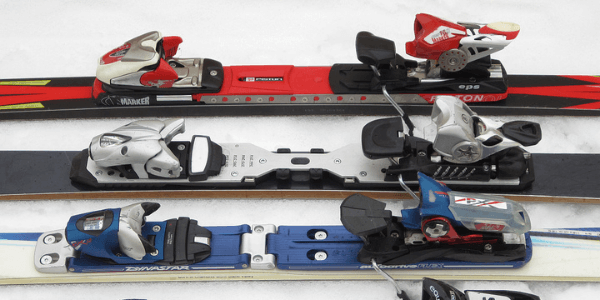
Binding Types at a Glance
Once you know your profile, you match it to the right binding category. The differences between binding types are significant — this is not just a branding distinction.
Alpine vs. Touring Bindings
| Binding Type | Best For | Release System | Weight | Typical DIN Range |
|---|---|---|---|---|
| Alpine (downhill) | Resort skiing only | Toe + heel release | Heavier | 3–18 |
| Alpine Touring (AT) | Backcountry + resort | Walk mode + release | Medium | 4–12 |
| Tech/Pin Bindings | Uphill-focused touring | Pin toe, heel clip | Lightest | 4–10 |
| Frame Touring | Entry-level touring | Frame holds boot | Heaviest | 4–10 |
For the vast majority of resort skiers, alpine bindings are the correct choice. They offer the widest DIN range, the broadest boot compatibility, and the most refined release systems. AT bindings make sense only if you're skinning uphill regularly — the walk mode adds meaningful weight for no benefit on a chairlift mountain.
Matching Binding to Ski Type
Your ski category also constrains your binding selection. These aren't interchangeable:
- Carving and frontside skis: Any alpine binding with an appropriate DIN — see our breakdown of what frontside skis are if you're deciding between categories
- All-mountain and powder skis: Alpine or AT bindings; confirm brake width matches the ski's waist
- Park and freestyle skis: Alpine bindings with twin-tip compatibility and a conservative DIN setting
- Backcountry-specific skis: Tech or frame AT bindings depending on your descent vs. ascent focus
One hard rule: brake width must match your ski's waist width within ±15mm. Go wider than that and the brakes won't engage properly in a fall. Buy wider brakes separately, or choose a different binding model.
How to Choose Ski Bindings — A Step-by-Step Approach
Here's the practical decision process, condensed into a sequence you can follow from gear shop to first run.
Steps 1–4: Selecting the Right Binding
- Calculate your DIN range. Gather your weight, height, boot sole length, age, and skill type classification. Use a DIN chart or the guide linked above to get your recommended range. Your final setting must land in the middle of whatever binding you buy — not at the top or bottom 10%.
- Choose your binding category. Resort-only skier? Alpine binding. Touring one or more days a week? AT or tech binding. Primarily uphill-focused with some descent? Tech binding. Mixed resort and occasional sidecountry? Alpine touring with a solid DIN range.
- Match your brake width. Measure your ski's narrowest point (the waist underfoot). Your binding brakes need to be within ±15mm of that measurement. If you're between sizes, go wider — brakes can be bent slightly inward, but not outward.
- Verify boot compatibility. Standard alpine boots use ISO 5355 norm. Frame AT bindings accept ISO 9523 touring boots. Tech bindings require boots with tech inserts in the toe and heel. Multi-norm compatible (MNC) bindings accept multiple standards — useful if you use different boot types.
Getting Your DIN Set Correctly
You can look up DIN values yourself, but professional mounting is the non-negotiable step. Ski shops use calibrated torque tools and test the actual release force — not just the number on the dial.
Never set your own DIN based on a guess or a friend's recommendation. A certified ski technician can mount and calibrate your bindings correctly in under 30 minutes — skip this step and you're gambling with your knees.
Once your bindings are mounted, verify the setup every season:
- Step in and apply forward pressure — you should not pre-release on flat ground
- Test lateral release with a deliberate heel rotation — it should release with firm but not excessive effort
- Re-check after any significant crash, which can shift binding components
- Re-test if your body weight changes by more than 10 pounds in either direction
Proper binding calibration is one of the most direct ways to avoid ski injuries on the mountain. It's also the most neglected. Skiers who skip annual recalibration are far more likely to experience the most common ski injuries that good bindings are specifically engineered to prevent.
Frequently Asked Questions
What DIN setting should a beginner use?
Most adult beginners fall in the DIN 3–5 range, depending on weight and boot sole length. Use a DIN chart with your physical stats and select Type I classification if you're new to skiing or returning after a long break. Your ski shop will confirm the correct number during mounting.
Can I use any bindings with any ski boots?
No. Alpine bindings require ISO 5355 alpine boots. AT frame bindings accept ISO 9523 touring boots. Tech bindings require boots with built-in tech inserts. Multi-norm compatible (MNC) bindings accept both alpine and AT boots, making them a flexible option if you own multiple boot types.
How often should ski bindings be replaced?
Most manufacturers recommend replacing bindings every 10–15 years, or sooner if the springs show wear, the release force becomes inconsistent, or the binding has been in a major crash. Annual certification checks by a ski technician will flag when a binding is no longer functioning within safe tolerances.
Do heavier skiers always need a higher DIN?
Weight is the primary input, but it's not the only one. A heavy beginner will have a lower DIN than a heavy expert because skill classification also adjusts the setting. A 200-pound Type I skier may have the same DIN as a 150-pound Type II skier. Always use the full four-factor calculation, not weight alone.
Key Takeaways
- Your DIN setting is calculated from four inputs — weight, boot sole length, height, and age — plus your skill type classification; getting this right is the foundation of safe binding selection.
- Alpine bindings are the correct choice for most resort skiers; AT and tech bindings add meaningful weight and are only worth it if you're regularly skinning uphill.
- Brake width must match your ski's waist within ±15mm, and boot compatibility (ISO 5355 vs. ISO 9523 vs. tech inserts) is non-negotiable before you buy.
- Professional mounting and annual recalibration by a certified ski technician are the single most effective steps you can take to prevent binding-related injuries.
 |
 |
 |
 |

About Frank V. Persall
Frank Persall is a lifelong skier originally from the United Kingdom who has spent years pursuing the sport across premier resorts in Europe, North America, and beyond. His passion for skiing has taken him from the Alps to the Rocky Mountains, giving him a broad perspective on resort terrain, snow conditions, gear performance across price points, and the practical realities of ski travel with a family. At SnowGaper, he covers ski resort guides, gear reviews, and skiing technique and travel resources for enthusiasts of every level.
You can get FREE Gifts. Or latest free skiing books here.
Disable Ad block to reveal all the info. Once done, hit a button below
|
|
|
|