After a long day on the mountain, you peel off your ski boots and feel that sharp, burning ache running along the front of your lower legs. You tell yourself it's just normal soreness. But when it keeps coming back every time you hit the slopes, it becomes hard to ignore. Can skiing cause shin splints? The answer is yes — and it happens more often than most skiers expect. Whether you're just getting started or you've logged years on the slopes, understanding the link between skiing and shin splints can help you stay on the mountain longer and in far less pain.
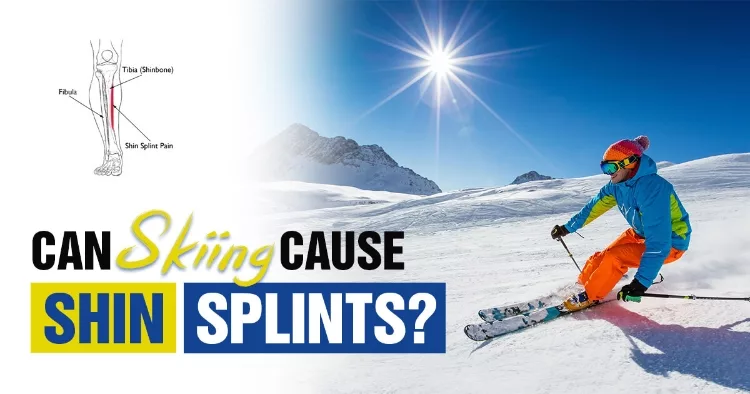
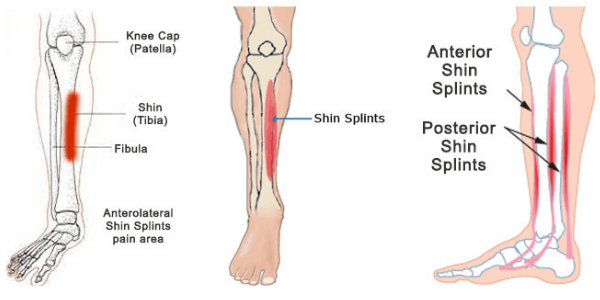
Shin splints — medically known as medial tibial stress syndrome — involve inflammation of the muscles, tendons, and bone tissue surrounding the tibia. While runners and dancers are the most commonly cited sufferers, skiers face a very specific set of mechanical stresses that can trigger the exact same condition. Rigid boot shells, prolonged forward flex, and hours of sustained pressure along the shin create the right environment for inflammation to develop.
This guide breaks down what's actually happening inside your leg when you ski, how to tell shin splints apart from other common complaints like shin bang, and what you can do — on and off the mountain — to manage the pain and keep it from coming back. There's also a comparison table to help you quickly identify what might be driving your symptoms.
Contents
- Understanding Why Skiing Stresses Your Shins
- How to Recognize Shin Splints Before They Get Worse
- Shin Splints vs. Shin Bang: Knowing the Difference
- Why Both Beginners and Veteran Skiers Are at Risk
- Boot Fit and Gear Choices That Affect Shin Health
- Quick Adjustments When Your Shins Already Hurt
- Building Long-Term Habits That Keep Shin Splints Away
- Frequently Asked Questions
- Final Thoughts
Understanding Why Skiing Stresses Your Shins
To properly answer whether skiing can cause shin splints, you need to understand the mechanics at work while you're on the mountain. Skiing is not a movement pattern your body is naturally built for. You're locked into a rigid boot that fixes your ankle and lower leg at a forward angle, then asked to flex and extend your knees repeatedly for hours. The muscles along the front of your shin — primarily the tibialis anterior — stay engaged throughout that entire time, working to stabilize your foot against the stiff shell.
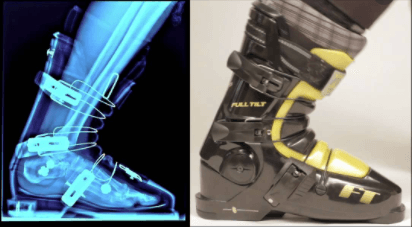
The Role of Ski Boot Mechanics
Ski boots are engineered to transfer your body movements to the skis with precision. But the same stiffness that makes them effective for performance places direct, sustained pressure on your shin. When you lean forward into the boot cuff — which is exactly what good ski stance technique requires — the plastic shell repeatedly presses against the tibia with every turn and transition. Over a full day of skiing, that repetitive contact compounds quickly into cumulative tissue stress.
Muscle Fatigue and Sustained Flex
The tibialis anterior isn't a muscle most people train specifically. When it's pushed harder than it's conditioned for — especially during long runs, steep terrain, or back-to-back ski days — it fatigues and begins to pull on the periosteum, the thin membrane covering the tibia. That pulling is what generates the dull, aching pain of shin splints. Unlike shin bang, which hits as a sharp impact, shin splint discomfort tends to build gradually over the course of a ski day and often feels worst the morning after.
How to Recognize Shin Splints Before They Get Worse
Catching shin splints early makes a real difference in how quickly you recover. The condition progresses through stages, and if you keep skiing through the early warning signs, you risk turning something manageable into a stress fracture — a far longer and more painful setback that can sideline you for the rest of the season.
Key Symptoms to Watch For
The most reliable indicator is a dull, diffuse ache along the inner or front edge of the shin that worsens during or after activity. You might notice it most when you first put your boots on, or again after you take them off at the end of the day. Tenderness when pressing along the tibia over a span of several inches is a clear early sign. Mild swelling in the lower leg can also appear, though it's often subtle and easy to dismiss. If the pain becomes sharp and localized to a small area rather than spread across a longer stretch of bone, that is a red flag for a possible stress reaction and deserves medical attention.
Pro tip: If pressing a finger along your shin produces one specific painful point rather than general tenderness, stop skiing and get it evaluated — localized bone pain can signal a stress reaction that won't heal on the mountain.
When to See a Doctor
Most early-stage shin splints respond well to rest, ice, and some adjustments to gear and technique. But if the pain persists after two or three days of rest, becomes sharp during low-impact walking, or arrives with noticeable swelling, it's worth seeing a sports medicine physician. They may recommend imaging to rule out a stress fracture, particularly if you've recently increased your ski volume or started the season without adequate base conditioning.
Shin Splints vs. Shin Bang: Knowing the Difference
One of the most common sources of confusion for skiers is telling shin splints apart from shin bang. Both produce shin pain during or after skiing, but they have different causes, different pain profiles, and different solutions. Getting the diagnosis right matters because treating one condition as the other won't bring much relief.
Comparing the Two Conditions
| Factor | Shin Splints | Shin Bang |
|---|---|---|
| Root cause | Muscle and tendon overuse stress on the tibia | Direct boot contact or excessive leg movement in shell |
| Pain character | Dull, aching, spread across several inches | Sharp, bruising sensation, concentrated at one point |
| When it's worst | During and after activity, often stiff the next morning | While boots are on, during hard turns or heel lifts |
| Tender area | Along 3–6 inches of the tibia edge | Specific spot where boot tongue makes contact |
| Visible signs | Possible mild swelling along lower leg | Bruising or localized swelling at contact point |
| Primary fix | Rest, strengthening, technique adjustment | Boot padding, improved shell fit, tongue wrap |
Shin bang is fundamentally a boot-fit problem — the cuff is too loose, allowing your leg to slide forward and slam the shell with each turn. Shin splints are an overuse problem rooted in muscle and tissue fatigue. Both can happen to the same skier simultaneously, which is part of why the overlap is so difficult to sort out.
Why Both Beginners and Veteran Skiers Are at Risk
You might assume shin splints are mostly a beginner problem — something that fades once your body adapts to skiing. That's only partially true. The risk doesn't disappear with experience; it just changes shape.
The Beginner's Challenge
If you're new to skiing, your lower-leg muscles haven't been conditioned for this type of repetitive, sustained work. You may be renting boots that don't fit properly, and you're likely spending more time in a stiff, defensive posture that places extra strain on the shins. Choosing beginner-friendly terrain — like the gentle runs at Lake Tahoe's family ski resorts — lets you build technique gradually without hammering your shins into exhaustion. Starting with shorter ski days and taking breaks isn't a compromise; it's the smarter long-term strategy.
The Veteran's Trap
Experienced skiers tend to overestimate their resilience. They cover more vertical feet per day, push into demanding terrain, and often ignore early warning signs because they assume their bodies can handle the load. A sudden increase in ski days, a new pair of stiffer boots, or the first trip of the season after months off can all trigger shin splints in skiers who've never had trouble before. The muscles need time to re-adapt at the start of every season, regardless of how many years you've been clicking into bindings.
Boot Fit and Gear Choices That Affect Shin Health
Your gear plays a larger role in shin health than most skiers acknowledge. The right equipment doesn't just improve your performance — it can be the difference between completing a full ski week and heading home early with ice packs strapped to your legs.
Finding the Right Flex Index
Ski boots are rated by a flex index that typically runs from 60 (very soft) to 130 or higher (very stiff). A boot that's too stiff for your ability level forces your muscles to work harder to maintain proper position, increasing strain on the tibia. A boot that's too soft provides inadequate support and allows excessive leg movement — hello, shin bang. If you're shopping for a new pair, take the time to get properly boot-fitted at a reputable ski shop, and read up on when to buy ski gear so you're not rushing the decision at the last minute. For most recreational skiers, a flex index between 80 and 110 offers a solid balance of control and comfort.
Warning: Avoid over-tightening your boot buckles. Cranking them too hard cuts off circulation and increases direct pressure on the tibia — the opposite of what your shins need during a long ski day.
Socks and Padding
The right ski sock can make a meaningful difference to your shin comfort. Thin, performance-fit ski socks — like the options reviewed in our ski socks guide — reduce bunching inside the boot, which eliminates pressure points along the shin. Look for socks with targeted shin cushioning and seamless construction. You can also add thin foam pads or a pre-cut adhesive cushion inside the boot tongue to reduce direct contact on sensitive areas. The same principle behind layering applies here — just as glove liners create a better fit and less friction in your hands, the right sock layer inside your boot protects against the friction and pressure that aggravates shin tissue.
Quick Adjustments When Your Shins Already Hurt
If you're mid-trip and your shins are already talking to you, you don't necessarily have to pack it in. A few adjustments can take enough pressure off the affected tissue to get you through the rest of your stay.
On-the-Spot Relief
Take breaks earlier and more often than you normally would. When you're riding the lift, stand flat — resist the urge to lean into the boot cuff while you wait. If your boots are buckled tight, loosen the top one or two buckles during lift rides to give your shin tissues a brief rest from sustained pressure. Stretching the tibialis anterior between runs also helps: point your toes downward and hold for 20 seconds to decompress the front of the lower leg before dropping in again.
Off-Slope Recovery
At the end of each day, ice the affected shin for 15 to 20 minutes and then elevate your legs above heart level for at least 30 minutes. Anti-inflammatory medications can take the edge off overnight, but they shouldn't become a tool for masking pain so you can push through another punishing day. If you're using a ski watch to log your vertical and daily activity, consider using its timer feature to prompt yourself to take rest intervals throughout the day rather than skiing until you're completely spent.
Building Long-Term Habits That Keep Shin Splints Away
The most effective approach to shin splints isn't treating them after they show up — it's building the fitness and habits that make them unlikely to develop in the first place. That work mostly happens away from the mountain.
Off-Season Conditioning
Targeted strengthening of the tibialis anterior and surrounding calf musculature is your best off-season investment. Toe raises, heel walks, and resistance-band ankle exercises build the muscular endurance needed to ski full days without breaking down. Adding single-leg balance work and calf raises improves lower-leg stability, which reduces how much you rely on the boot for support. Skiers who cross-train with hiking or trail running tend to arrive at the season with far more lower-leg resilience than those who come in cold from months of inactivity.
Pacing Yourself on Ski Days
Gradual progression matters more than most skiers want to admit. On your first day of the season — or the first day of a trip after a long break — consider cutting your usual vertical by roughly a third. Give your body two to three days to adapt before pushing into full-day efforts. On longer trips, build in a deliberate rest day mid-week rather than skiing every consecutive day until exhaustion sets in. Reviewing your complete gear setup before the season starts is also a smart habit — worn-out equipment forces subtle compensations that compound fatigue throughout the day.
Frequently Asked Questions
Can you keep skiing with shin splints?
You can ski through mild shin splints with careful management — take more frequent breaks, loosen the top boot buckles on lifts, and ice thoroughly at the end of each day. That said, if the pain is sharp, isolated to a specific point on the bone, or worsening with each run, you should stop. Pushing through escalating shin splint pain risks converting the condition into a stress fracture, which requires weeks of complete rest and takes you off the mountain far longer than a few days of caution would have.
Do ski boots cause shin splints?
Ski boots are a major contributing factor, but they don't cause shin splints on their own. A boot with the wrong flex index, a poor shell fit, or overtightened buckles significantly increases the pressure and workload placed on the shin tissues. Getting a professional boot fitting — where a fitter assesses your foot shape, leg alignment, and skiing ability — is one of the most impactful steps you can take to reduce your shin splint risk before symptoms ever start.
How long does it take to recover from skiing-related shin splints?
Mild shin splints typically resolve within one to three weeks of rest, depending on how far the condition progressed before you backed off. More advanced cases can take four to eight weeks. The key is avoiding a premature return to full ski intensity. Most sports medicine professionals recommend a gradual comeback — starting with shorter, easier days on mellow terrain — while also addressing the underlying cause, whether that's boot fit, technique, or inadequate pre-season conditioning.
Final Thoughts
Shin splints are a real and frustrating setback, but they're also largely preventable with the right preparation and self-awareness. Start by taking an honest look at your boot fit — get a professional fitting if you haven't had one recently — and begin building lower-leg strength before your next season starts. If your shins are already bothering you, rest now rather than grinding through the pain and paying a bigger price later. A few smart adjustments can mean the difference between a season cut short and one that keeps you on the mountain all the way through.
 |
 |
 |
 |

About Frank V. Persall
Frank Persall is a lifelong skier originally from the United Kingdom who has spent years pursuing the sport across premier resorts in Europe, North America, and beyond. His passion for skiing has taken him from the Alps to the Rocky Mountains, giving him a broad perspective on resort terrain, snow conditions, gear performance across price points, and the practical realities of ski travel with a family. At SnowGaper, he covers ski resort guides, gear reviews, and skiing technique and travel resources for enthusiasts of every level.
You can get FREE Gifts. Or latest free skiing books here.
Disable Ad block to reveal all the info. Once done, hit a button below
|
|
|
|